

How Often Should You Replace Your Breast Pump Parts
A calendar can tell you when to inspect breast pump parts, but it cannot confirm that a part is worn. Changes during an otherwise familiar session are often more revealing: suction feels weaker, milk appears near the bottle, pumping takes longer at the usual settings, or the flange begins to shift. Check the intervals in the pump manual as well, but treat each symptom as a reason to investigate rather than immediate proof that something needs replacing.
Setup problems can produce much the same experience. A valve may be off center, moisture may be trapped beneath a membrane, or a loose connection may interrupt the seal. An unsuitable flange fit can also affect comfort and stability. Rule out those possibilities before ordering breast pump replacement parts.
For a practical reference point, eufy’s official duckbill valve listing says the valves typically last 1–3 months. That range is a prompt to inspect them, not a fixed expiration date. Usage frequency, visible wear, changes in suction, and the instructions for the specific pump still matter more than the calendar alone.
Rule Out Cleaning and Assembly Problems First
Weak suction after washing can look like sudden part failure. In practice, a valve may be slightly off center, a membrane may catch at one edge, or a bottle may start on the threads at an angle while still appearing attached. Soap residue can leave a rim slippery enough to interfere with the seal.
Take the washable assembly apart and rebuild it slowly. The valve should sit flat, the membrane should meet its rim evenly, and the bottle or container should turn without resistance. If the design includes tubing, check both connections rather than pressing harder on the pump controls.
Drying matters too. The CDC’s How to Clean and Sanitize Breast Pumps advises allowing cleaned parts to air-dry thoroughly before storage or reassembly. Moisture trapped beneath a membrane may interfere with the seal and make a usable part appear worn, so wait until every washable piece is completely dry before testing the pump again. During the next normal session, listen for a faint hiss and watch for movement around the connections, as either sign may point to an air gap.
Issues caused by residue or poor assembly can be fixed easily. If a fully cleaned, completely dry component still cannot form a tight seal, permanent wear is likely the cause.
Use Each Symptom to Narrow the Parts to Check
Once setup and cleaning issues are eliminated, your symptoms will guide troubleshooting. You do not need to test every component; focus only on parts linked to the problem you encounter.
Weak or Uneven Suction
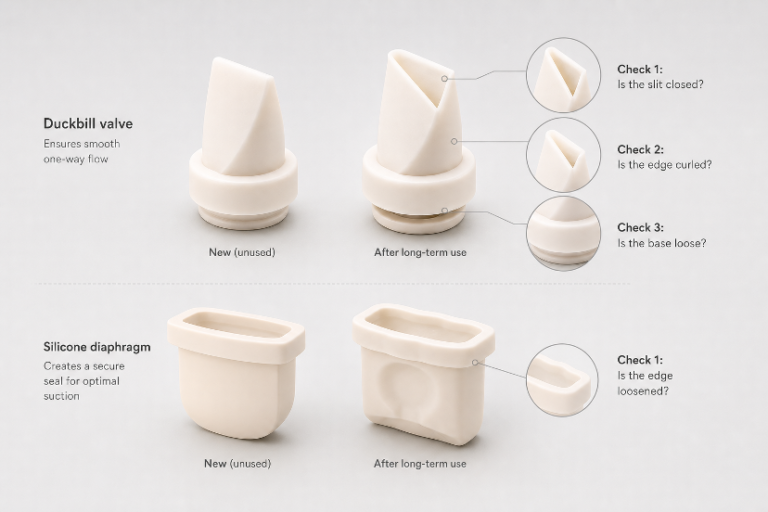
When the pump powers on normally but suction has faded, inspect the smallest silicone pieces first. Duckbill valves, valve membranes, diaphragms, and backflow membranes repeatedly bend and return to shape during a session, so their edges can stop meeting as precisely as they once did.
Hold a duckbill valve toward a bright window or lamp. Its opening should rest closed when untouched; a visible gap, curled lip, uneven slit, or fine tear suggests that the seal has changed. Check the base as well. It may wobble on the connector even when the opening looks normal from the front.
Membranes and diaphragms tend to show quieter signs. Look for a lasting ripple, a dent that does not relax, or an edge that lifts from the rim, then check its positioning once. Use clean, dry hands and avoid pulling a valve slit apart, since stretching it can create the problem being checked.
Milk Around the Bottle or Connector
The first wet spot matters more than the largest puddle. Avoid forcing the bottle into place; if the threads catch at an angle, back off rather than tightening through the resistance. Cross-threading can resemble a cracked connector.
Dry the exterior before the next use and watch where the first drop forms. Moisture below the connector points somewhere different from a bead around the flange tunnel. Overtightening every joint may stress the plastic without closing the original gap.
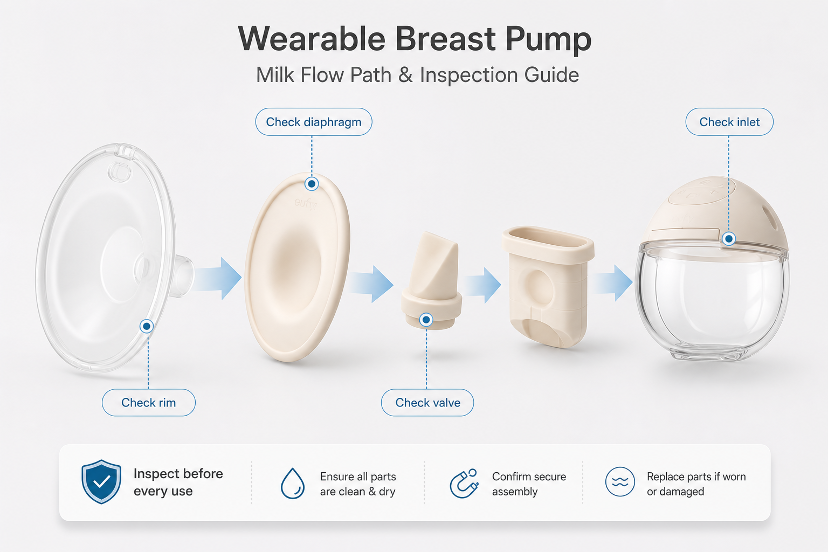
Inspect the connector under direct light for a hairline crack, cloudy stress mark, bent edge, or thread that no longer tightens normally. Valve placement belongs in the same check because a backward, twisted, or partly attached valve can leak when new. Correct placement combined with an open or loose fit makes wear more likely.
Pumping Takes Longer at Familiar Settings
A longer session has no single explanation, but wear becomes worth checking when the pump setting and routine have stayed much the same. If an unused spare is available, set it beside the older valve and compare the slit, base, thickness, and outline. Used silicone may look wider or less crisp around the edge.
Check the breast pump parts names used in the manual before ordering. Pieces that look similar in a small product image may be listed as a valve, membrane, diaphragm, backflow protector, connector, flange, or insert. Both the part name and pump model need to match.
Loose, Shifting, or Uncomfortable Flange Fit
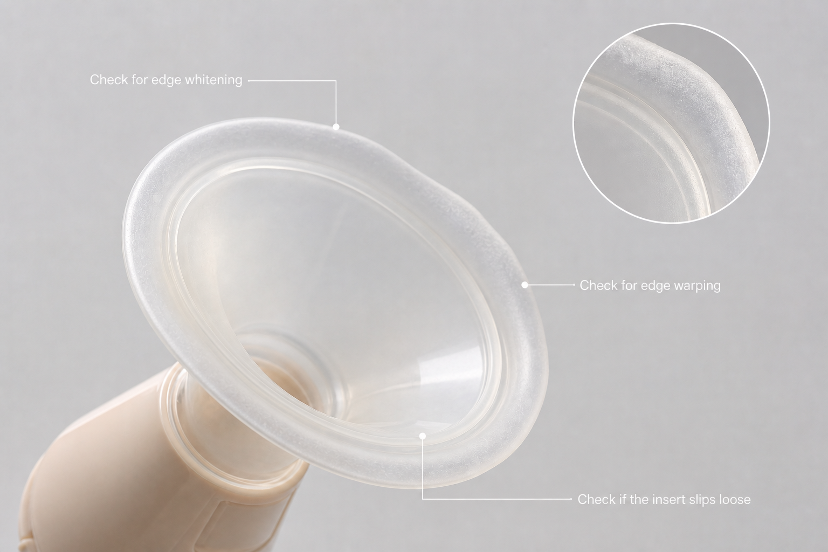
Run a fingertip around the clean flange edge and check for whitening, warping, rough patches, cracks, or a bent lip. A soft insert can stretch too, and slight changes may be easier to feel than see.
Breast pump flange size can also be mistaken for part failure: a tight fit may pinch, while extra space may allow the flange to move. For help measuring and choosing the right fit, see eufy’s breast pump flange size guide.
Watch the seal during a normal session. A flange that rocks, lifts at one edge, or loses contact during movement may have an alignment or fit problem rather than a worn valve. Replacing an unrelated valve will not correct a flange seal affected by alignment or size.
Replace by Condition, Not by Calendar Alone
Use the replacement intervals in the pump manual as inspection prompts. Flexible seals such as duckbill valves and membranes tend to wear faster than rigid parts, especially with frequent use, but age alone does not confirm failure.
| Part | Replace or escalate when |
| Valves and membranes | Torn, curled, gaping, loose, or unable to sit flat |
| Flanges and inserts | Cracked, rough, whitened, or permanently distorted |
| Connectors and tubing | Cracked, discolored, leaking, or repeatedly loose |
| Motor and pump body | Unusual noise, power failure, or an error message; contact support rather than opening the unit |
An intact part that still seals correctly may not need replacing simply because a general time range has passed. Visible damage or a failed seal is a stronger reason to act.
If you prefer to keep commonly replaced parts on hand, eufy’s breast pump accessories subscription service offers a replacement kit on a three-month auto-delivery schedule at 15% off. You can pause or cancel the subscription anytime.
If the same replacement fails again, confirm the model and size, then review the cleaning and storage instructions. Persistent pain or irritation may fall outside parts troubleshooting and warrants advice from a healthcare professional or lactation consultant.
Match Replacement Parts to the Exact eufy Model
Parts that look alike online can still differ at the rim, connector, or seal depth.
Accessory compatibility varies by listing. The official replacement duckbill valves page lists compatibility with eufy Wearable Breast Pump E10, E20, S1, and S1 Pro and marks these valves as HSA/FSA eligible. Actual coverage depends on your individual plan, so confirm the applicable rules with your plan administrator or benefits provider before purchasing.
When several pieces need checking, the eufy wearable pump accessories collection keeps the available parts together.
Conclusion
A changed pumping session is the starting point, not proof that every washable part has reached the end of its life. Rule out residue, moisture, assembly, alignment, and flange fit, then inspect the part most closely connected to the symptom. That order helps avoid replacing the wrong component.
Keeping a few model-specific, high-wear spares can make visual comparison easier, especially when an older valve or membrane can be viewed beside an unused one under good light. Replace the part that shows a real change, and follow any separate replacement instructions in the pump manual. Other components can remain in service until their condition or performance points elsewhere.

0 Comments